Espresso Drink Guide
ai-image-editor
Any aspect ratio
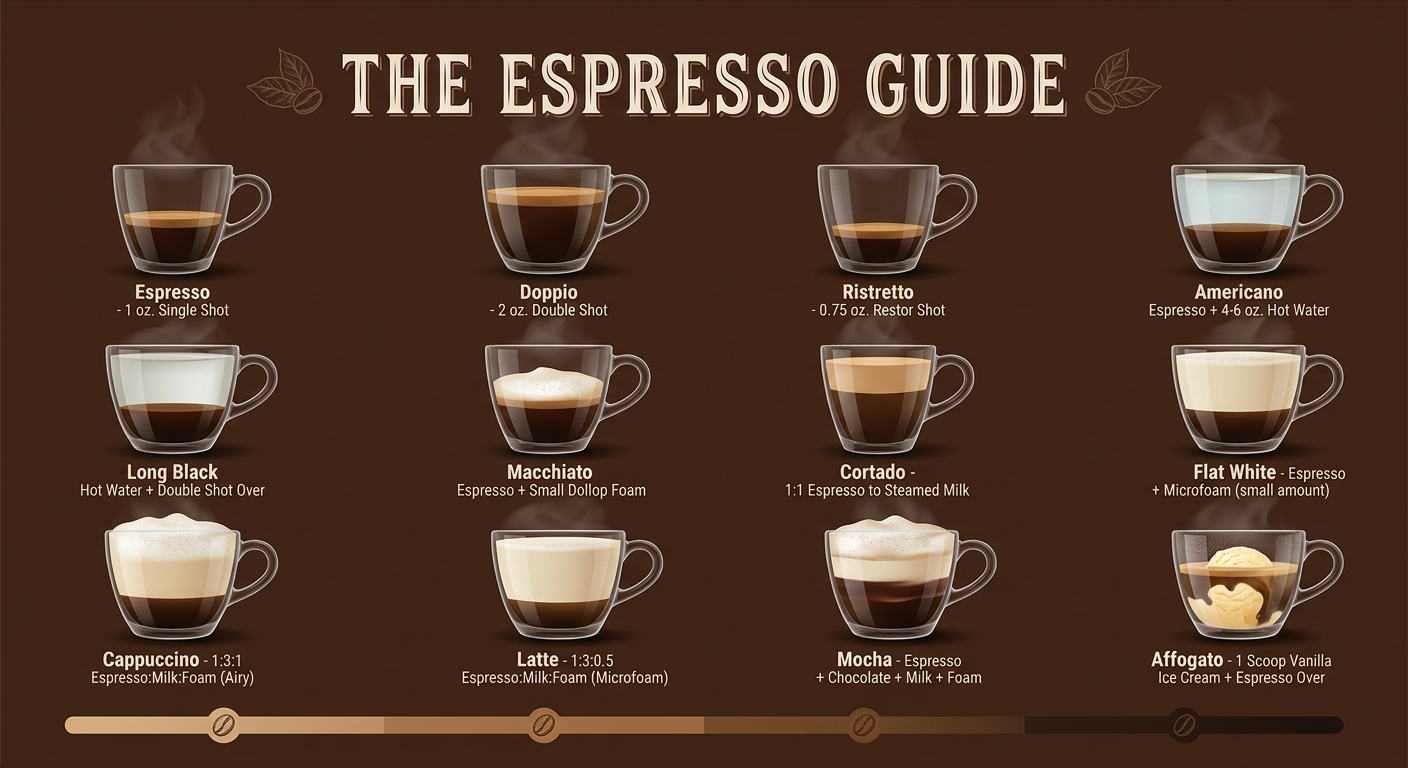
Elegant coffee infographic showing 12 classic espresso-based drinks arranged in a 4x3 grid on a rich dark roasted-bean brown background. Each drink is displayed as a transparent glass cup cross-section revealing distinct colored layers — dark espresso at the bottom, steamed milk in creamy white, foam as airy cloud-like caps, chocolate syrup in deep brown, vanilla in pale gold. Drinks include: Espresso, Doppio, Ristretto, Americano, Long Black, Macchiato, Cortado, Flat White, Cappuccino, Latte, Mocha, Affogato. Each glass has a clean label underneath in modern sans-serif typography with the drink name and a one-line ratio description (e.g. ""1:1 espresso to steamed milk""). A large decorative title at the top reads ""THE ESPRESSO GUIDE"" in elegant serif letterpress style with a subtle coffee bean illustration. Warm ambient lighting with soft shadows under each glass, slight condensation on cold drinks, wisps of steam rising from hot drinks. Bottom bar shows a roast-level gradient strip from light to dark with bean icons. Clean editorial layout, premium café poster aesthetic, photorealistic glass rendering with illustrated diagram overlay.
AI Image Editor Template: Realistic AI Photo Editing in Minutes
Transform any image into a production‑ready visual with this AI Image Editor template. Use it as a starting point to retouch photos, replace backgrounds, remove objects, change outfits, or generate entirely new variations—without needing Photoshop skills.
This template is built on Magic Hour’s AI Image Editor, so you can remix it, adapt it to your brand, and chain it with other Magic Hour tools for end‑to‑end content workflows.
What You Can Do With This Template
Use this template as a practical shortcut for:
Product & marketing images
- Clean up product shots, remove distractions, and generate multiple lifestyle scenes from a single photo
- Pair with AI Background Generator and AI Image Upscaler for ad‑ready creatives
Professional portraits & headshots
- Fix lighting, tweak facial features, and enhance details
- Combine with the AI Headshot Generator or AI Selfie Generator to create consistent, on‑brand portraits
Fashion & outfit changes
- Change clothes, styles, and accessories while keeping the same person and pose
- Extend with AI Clothes Changer, AI Fashion Generator, or AI Outfit Generator to explore full lookbooks
Creative and character editing
- Turn real photos into stylized art, anime, or comic panels
- Combine with AI Art Generator, AI Anime Generator, AI Manga Generator, or Animated Characters Generator
Cleanup & restoration
- Remove unwanted objects, people, or watermarks
- Use alongside AI Remover, Remove Object from Photo, Watermark Remover, Old Photo Restoration, and Photo Colorizer
How to Remix This Template in Magic Hour
You can clone this template’s behavior and adapt it to your own use case in a few steps:
Open the template in Magic Hour
- Start from this AI Image Editor template inside Magic Hour.
- Click to duplicate or “remix” it so you can customize prompts, inputs, and outputs.
Define your editing pattern
- Decide what the template should reliably do:
- “Clean ecommerce product shots”
- “Turn selfies into professional LinkedIn portraits”
- “Convert photos into anime characters”
- “Generate ad creatives from base product photos”
- Write short, clear, reusable prompt instructions that describe the desired transformation (e.g., remove background, keep lighting natural, preserve face identity, etc.).
- Decide what the template should reliably do:
Specify input expectations
- Clarify the kind of images this template is designed for (e.g., single subject, product on plain background, close‑up portrait, full‑body shot).
- This helps both human users and LLMs understand when to pick this template over others.
Add optional chained tools (advanced workflows)
- For richer pipelines, connect this template conceptually with:
- AI Image Generator or AI Photo Generator to create a base image
- Image to Video or Text to Video to animate the edited image
- AI GIF Generator to export looping social content
- Video Upscaler or AI Image Upscaler for high‑resolution output
- For richer pipelines, connect this template conceptually with:
Optimize the template for reuse
- Add a short description explaining:
- What the template is best at
- What kind of inputs work poorly (e.g., extremely low‑res images, crowded group shots)
- Include a few example prompts or “recipes” (e.g., “Remove background and generate 3 lifestyle variants”, “Turn into Pixar‑style character while preserving facial features”).
- Add a short description explaining:
Example Use Cases for Creators & Teams
For marketers & growth teams
- Rapidly generate ad variants and social graphics from a base product photo
- Localize creatives for different markets by editing text elements and backgrounds
- Combine with:
- Thumbnail Maker for YouTube and social
- AI Logo Generator and Album Cover Generator for brand visuals
- Book Cover Generator for campaigns tied to content or reports
For founders & product teams
- Build consistent brand imagery for pitch decks, landing pages, and in‑product visuals
- Prototype UI illustrations using AI Illustration Generator and refine them in AI Image Editor
- Use AI QR Code Generator to embed scannable experiences into your edited designs
For content creators & educators
- Turn ordinary photos into stylized visuals for newsletters, courses, and social posts
- Create characters or avatars with AI Character Generator, Avatar Generator, or AI Face Generator, then refine them with this template
- Extend static visuals into motion using:
Turning Edited Images Into Video and Animation
Once you’ve created a strong edited image using this template, you can push it further:
Face‑driven video content
- Use Face Swap Video to place your edited face into existing footage
- Use Lip Sync to match mouth movements to any audio
Stylized video variations
- Use Video to Video to restyle existing clips in the same visual style as your edited image
- Animate characters or scenes with Animation
Meme, social, and fun formats
- Turn edited images into shareable content with the AI Meme Generator
- Experiment with Disney AI Generator, Superhero Generator, Pokemon Generator, or Optical Illusion Generator
Advanced Creative Workflows With AI Image Editor
For users building more complex visual systems or tools on top of Magic Hour:
Style systems & visual languages
- Define repeatable aesthetics using Dark Fantasy AI, Graffiti Generator, or Comic Book Generator, then standardize them via this template
- Use Architecture Generator, AI Interior Design Generator, and Fantasy Map Generator for environment concepts you refine with AI Image Editor
Character & portrait systems
- Build reusable character sheets with Full Body Generator, Gender Swap, and AI Face Editor
- Use the template to maintain identity consistency across different outfits, scenes, and angles
Asset cleanup and preparation
- Prep assets with Image Background Remover, Unblur Image, and Photo to Sketch
- Finalize details—color correction, compositional tweaks, object removal—using this AI Image Editor template
Tips for High‑Quality Results
- Start from clear, well‑lit images whenever possible; AI editing works best when faces, products, or key shapes are easy to detect.
- Keep instructions short and specific. Describe the desired outcome (“replace background with modern office, soft daylight”) rather than step‑by‑step edits.
- Preserve identity when needed. If you’re editing portraits or characters, emphasize keeping the same face, pose, and proportions in your prompt.
- Iterate in small steps. For complex transformations (e.g., full outfit change + style shift + background replacement), run a couple of focused passes rather than everything at once.
Use this AI Image Editor template as your base, then remix it into specialized tools for your team: a product‑photo cleaner, a brand headshot generator, a social‑post artwork builder, or a character editor. Once you have a version that consistently produces the look you want, share it across your workspace so anyone can produce on‑brand, high‑quality visuals in a few clicks.