How to write effective text prompts to generate AI videos


Quick answer
Write an AI video prompt as a shot description: subject, action, setting, camera and lighting. Keep it to one coherent event, and specify sound only if the selected model supports audio. Generate a short draft, identify the main mismatch, then revise one instruction. Avoid asking a single clip to contain several unrelated scenes or contradictory camera moves.
A Copyable Prompt and a Simple Revision
A red ceramic mug sits beside a closed book on a wooden desk. Steam rises slowly from the mug. The camera moves gently forward at desk height. Soft window light comes from the left.
Steam rises slowly. The camera moves gently forward; the mug and book remain in place.
If the camera moves too much, change only that instruction: “The camera stays fixed at desk height.” If the model invents a hand, simplify the request around the mug and steam before adding another action. These are original practice prompts, not tested outputs or quality guarantees.
The camera stays fixed at desk height.
Problem in the output | What to change first |
|---|---|
Important subject is missing | Put the subject and action at the start of the prompt |
Camera motion overwhelms the action | Use one explicit, restrained camera direction |
Character or product changes | Check the reference and simplify the movement |
Clip jumps between scenes | Reduce unrelated events or split them into separate shots |
Unwanted or missing sound | Check native-audio support and the actual audio settings |
Result ignores the requested duration | Set duration in the tool rather than relying on the prose |
Test one structured video prompt
Describe one subject, one action, one setting and one camera move. Generate a short draft, name the largest mismatch, and revise only that instruction.
Open Text-to-VideoCurrent guidance was rechecked September 13, 2026 against Magic Hour’s text-to-video workflow and Runway’s text-to-video prompting guide. Both support starting from clear visual and motion instructions, then iterating; the selected model still determines supported duration, references, resolution and audio.
Why Prompts Matter More in Video Than in Images
Images are static: a single frame to describe. But video requires motion, continuity, and narrative. This introduces extra challenges:
- Temporal consistency - Characters must look the same across frames.
- Motion clarity - The AI must understand not just “what is in the scene” but “how it moves.”
- Cinematic framing - Camera angle, pacing, and transitions all depend on how you describe them.
A short clip does not need a complete story arc. First decide what must change on screen: a person turns, the camera reveals a room or light moves across a product. Add more beats only when the selected model and duration can support them.
The Core Structure of a Strong Video Prompt

Use the structure below as a starting template. Runway’s text-to-video guide recommends describing the essential visual and motion elements first, then refining details. This article’s examples are suggested prompts, not results from a cross-model benchmark.
- Subject and Action - Who is in the scene, and what are they doing?
- Example: “A cyberpunk detective walking through a neon-lit alley.”
- Example: “A cyberpunk detective walking through a neon-lit alley.”
- Environment - Where the action happens.
- “The alley is wet from rain, with glowing signs and steam rising from vents.”
- “The alley is wet from rain, with glowing signs and steam rising from vents.”
- Camera Direction - How the audience sees it.
- “Low-angle tracking shot following behind the detective.”
- “Low-angle tracking shot following behind the detective.”
- Lighting and Atmosphere - Sets the tone.
- “Soft neon pink and blue reflections shimmer on the walls.”
- “Soft neon pink and blue reflections shimmer on the walls.”
- Style or Reference - Anchors the visual consistency.
- “In the style of Blade Runner 2049.”
The goal is a readable shot brief. Omit a field if it adds no useful direction; a list of every possible cinematic adjective is not required.
Write the subject and action first, then add setting, camera and light as needed. For a multi-shot sequence, make a separate storyboard or shot list before combining the clips. Keep the same character and object descriptions where continuity matters.
Common Mistakes in Prompt Writing
- Unclear action: describe what visibly changes during the shot.
- Conflicting camera directions: choose a locked frame or a moving shot, or explicitly sequence the change.
- Too many simultaneous events: isolate the event that matters most.
- Unsupported controls: duration, resolution, seed and negative-prompt fields depend on the model; typing them into prose does not necessarily set them.
- An unsuitable reference image: a prompt cannot reliably recover an obscured face or the unseen side of a product.
For image-to-video, let the source image carry appearance and composition, then describe the intended motion. Runway’s current guide makes this distinction explicit: text-to-video needs visual and motion details; image-to-video should focus on movement. Other models may expose additional reference controls.
Genre-Specific Prompting
1. Cinematic Storytelling
Focus on camera language and emotional tone.
A young woman stands on a cliff at sunset, wind blowing her hair, wide shot from behind as she faces the horizon, soft golden light and sweeping orchestral feel.
Separate the visible shot from the soundtrack. The cliff, camera position, light and hair movement describe the picture; an orchestral cue only affects generation in a model that supports audio. Otherwise, add music during editing. A cinematic prompt is not evidence that one model outperforms its rivals.

2. Action and Sports
Focus on motion verbs and camera tracking.
A basketball player sprints down a narrow alley, the camera glides alongside him in a fast dolly shot, neon graffiti glowing on the walls, sweat glistening under harsh streetlights.
For sport or martial-arts scenes, inspect body mechanics, contact with the ground, and continuity throughout the motion. Model labels do not guarantee correct physics.
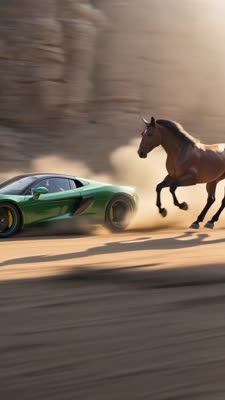
Workflow recipe
A powerful horse runs alongside a luxury green supercar through a vast desert canyon. Golden sunlight, dramatic dust trails, dynamic motion blur, realistic lighting and an epic high-speed chase atmosphere.
- Model
- Kling 3.0
- Format
- 9:16
- Duration
- 5 seconds
- Resolution
- 1080p
3. Animated or Stylized
Describe the visual treatment you want to preserve.
Three kids running through a mystical forest, rendered in Studio Ghibli watercolor style, vibrant glowing mushrooms, slow panning shot.
For stylized video, describe the rendering treatment—such as watercolor backgrounds, clean outlines or soft cel shading—and the motion. If you have an approved reference image, use it where supported. Compare one change at a time, such as a close-up versus a wider tracking shot; do not call a result more consistent without reviewing a sequence.
The Role of Prompt Iteration
No prompt is perfect on the first try. Iteration is part of the process:
- Start with one essential action and a suitable reference, if needed.
- Watch the complete output and identify the largest mismatch.
- Change one instruction or setting while keeping the others stable.
- Record the model, input, prompt, settings and result.
- Stop when the shot meets the edit’s requirements; retain the accepted file.
For an automated workflow, prove the prompt on a small representative sample before sending a batch. Our AI video and image API comparison covers integration and cost differences. A batch runs more attempts; it does not establish that the outputs are usable.
Prompt Length: Short vs Long
- Short prompt: specify the essential scene and motion, such as “Soft colored light travels slowly across a dark wall. Locked wide shot.”
- More detailed prompt: add a required sequence or camera change, such as “A person closes a notebook, looks toward the window and stands. Medium shot at desk height; the camera stays still. Warm afternoon light.”
specify the essential scene and motion, such as “Soft colored light travels slowly across a dark wall. Locked wide shot.
add a required sequence or camera change, such as “A person closes a notebook, looks toward the window and stands. Medium shot at desk height; the camera stays still. Warm afternoon light.
Use the shortest prompt that contains the required visual instructions. There is no universal word count or rule that longer prompts produce more realism. Add detail to correct a specific omission, and check the chosen model’s prompt-length limit.
Multimodal Prompting

More models accept not just text but image + text prompts. For instance, starting from a photo and layering text instructions for motion.
This is especially useful for YouTube workflows, as explored in resources on faceless YouTube channels.
For a product photo, begin with a modest camera move that keeps the visible packaging in view. A 360-degree rotation forces the model to invent the unseen back and sides. For a landscape, specify one camera move and inspect whether important landmarks remain unchanged. Neither input guarantees an ad-ready result.
Prompt Libraries and Style Templates
A pro tip for creators is to maintain a prompt library: a personal database of tested structures, styles, and scene instructions.
For example:
- Sports: identify the action and follow the subject with a suitable camera move. Add slow motion only when that pacing serves the edit.
- Travel: choose a reveal, pan or stationary view that fits the location.
- Product ads: keep important labels visible and use motion that avoids inventing hidden geometry.
Save prompts with their reference files, model versions, generation settings and accepted outputs. A prompt that worked in one model is a starting point for another, not a guarantee. For a recurring character or product, keep a small approved reference set alongside the prompts.
Where Prompting Fits in the Bigger Creator Stack

Prompt writing isn’t just a technical trick - it’s part of the broader creator workflow:
- New footage from an idea: use Text-to-Video.
- Animate an approved still: use Image-to-Video.
- Change existing footage: start with the video-to-video workflow.
- Plan several shots: prepare a storyboard before generating.
A clear prompt reduces ambiguity, but the model, source material and edit also matter. When a result fails, decide whether the problem is the wording, an unsuitable input, an unsupported feature or a shot that would be easier to film or edit conventionally.
Before You Generate
Check that the request describes a shot the selected tool can produce:
- One clear subject and action.
- A compatible source image when using image-to-video.
- Camera and style instructions that do not conflict.
- A duration selected in the actual controls.
- Audio requirements supported by the model or planned separately.
- A practical reason to accept or reject the finished clip.
Choose the smallest draft that can answer your main question, then review the entire clip before increasing spend.
For model and workflow choices, see the best AI video generators guide. For dialogue, Google’s Veo prompt guide covers speech and sound instructions. An attractive final frame is not enough: the shot must work through the whole duration.
Continue Reading

How to prompt AI videos: a practical 10-step guide

10 best AI video generators in 2026: models, features, and costs

Best free video editing software: 8 editors and export limits

7 best text-to-video AI tools: free limits, costs and uses

Text-to-image API integration guide: request to accepted image
