Seedream Edit, Explained - A Practical Guide

Most image editors make you choose between two modes of work. You either generate from scratch or you patch what already exists. You bounce between tools, rewrite prompts, export, re-import, and lose the thread. It feels like trying to draw a straight line on a moving train.
Seedream 4.0 collapses that split. It’s a single model built for generation and editing together. Give it a photo and say “keep the face exactly the same, switch the background to a rainy Shinjuku street, add wet reflections, and leave the earrings alone.” It will try to obey the instruction rather than re-interpret your entire image. That one behavior—respecting what you ask to stay—is why it’s useful.
Below is how I think about Seedream Edit in practice: what it’s good at, where it still needs help, and the playbooks that ship work. I’ll also share how we pair it with Magic Hour’s AI Image Editor for finishing, export sizes, light corrections, and watermarking. The goal is not a model demo. The goal is a clean, repeatable pipeline you can hand to a teammate and trust.
Why Seedream Edit matters
The short version: it listens.
- Precision instruction editing – You can add, remove, replace, or reference elements in plain language. The model tries to confine the change to the region you describe instead of “creatively reimagining” the whole frame.
- High feature retention – Faces, hairlines, jewelry, logos, label layouts, material textures. When those must survive the edit, they usually do, if you tell it so.
- Intent understanding – Vague ideas can be shaped into concrete images. If you know what you want in spirit but not in pixels, you can still get there.
- Multi-image input and output – Feed multiple references and ask for a consistent set back. Useful for storyboards, product lines, and mood boards.
- High resolution – Prints, hero banners, storefront signage, no problem. You can finish with a subtle sharpening and color pass in Magic Hour.
That’s the promise. Now the practical details.
The mental model that keeps results consistent
Think of every edit as four lines:
- What must not change
Lock identity and the non-negotiables.
“Keep face, hair, jewelry, label text, and pose unchanged.” - What to change
Name the region and the manipulation.
“Replace background with a golden-hour beach bokeh. Add soft rim light camera right.” - Scope and constraints
Limit where the model can touch.
“Edit background only. No changes to clothing or skin.” - Aesthetic and output
Set the look and quantity.
“Warm palette, shallow depth of field, cinematic but natural. Generate 6 options.”
If you write prompts in that order, your variance drops and your wins go up. When things go wrong, it’s almost always because line 1 or 3 was missing.
Where Seedream shines, and where it stumbles
Strengths
- Identity retention when you provide 3–6 references of the same person or product.
- Localized edits that follow instructions rather than overwriting the composition.
- Cross-style conversions that keep structure intact: photo → illustration, photo → 3D look, etc.
- Batch generation of related frames with shared color rules and lighting.
Weak spots
- Extremely small typography, dense UI shots, and micro-details sometimes need a second pass.
- Hair wisps on busy backgrounds can halo. A narrow mask helps.
- If the prompt is short and open-ended, the model may “improvise.” Be explicit about what stays.
This is why we pair Seedream with the Magic Hour AI Image Editor. Do the heavy lifting upstream, then finish with the boring but critical work downstream: exact crop, export sizes, subtle contrast, grain, overlays, and watermarks. It turns a good image into a shippable asset.
Setup options
You can use Seedream Edit through hosted playgrounds or direct APIs. The exact vendor doesn’t matter for the workflows below. What matters is that you can:
- Upload multiple images as references.
- Provide one instruction prompt that lists “keep” and “change.”
- Request multiple outputs per run.
- Optionally provide a mask when you need surgical precision.
Once your account is set up, create a working folder with these subfolders: inputs/, references/, selections/, exports/, and a notes.md for prompt snippets. Small structure changes like this reduce chaos once you’re moving dozens of images a day.
A field guide to edits that ship
These are the plays we use most often. They’re simple on purpose. Simple scales.
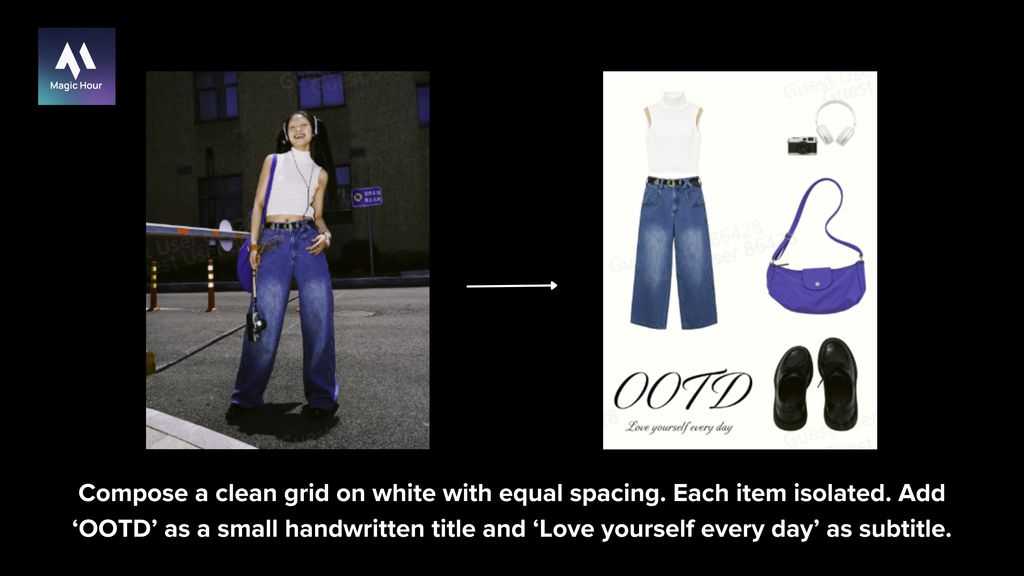
1) OOTD grids and matching displays
- Use case – Social content, shop listings, lookbooks.
- Input – One person photo. Separate product shots for top, pants, accessories, shoes.
- Instruction – “Compose a clean grid on white with equal spacing. Each item isolated. Add ‘OOTD’ as a small handwritten title and ‘Love yourself every day’ as subtitle.”
- Finishing – Align the baseline grid, check anti-aliasing on type, export square and story formats.
2) Nine-grid emojis and big-head stickers
- Use case – Chat packs, fan communities.
- Input – A set of headshots or a single expressive portrait.
- Instruction – “Create a nine-panel sticker sheet with exaggerated expressions. Decorate edges with playful borders.”
- Finishing – Tighten edges, export 512 px PNGs, bundle as a zip.
3) A weekly emoji set from one photo
- Use case – Community and internal comms.
- Instruction – “Generate seven related emojis labeled Monday through Sunday. Keep identity and lighting consistent.”
- Finishing – Add tiny weekday tags. Consistent baseline helps the pack feel designed, not random.
4) Sketch → doll or figurine
- Use case – Merch concepts, toy mockups, character IP.
- Input – Clean line drawings.
- Instruction – “Convert to a physical doll look. Preserve silhouette and icon features. Neutral softbox lighting.”
- Finishing – Clean seams and specular highlights in the Image Editor.
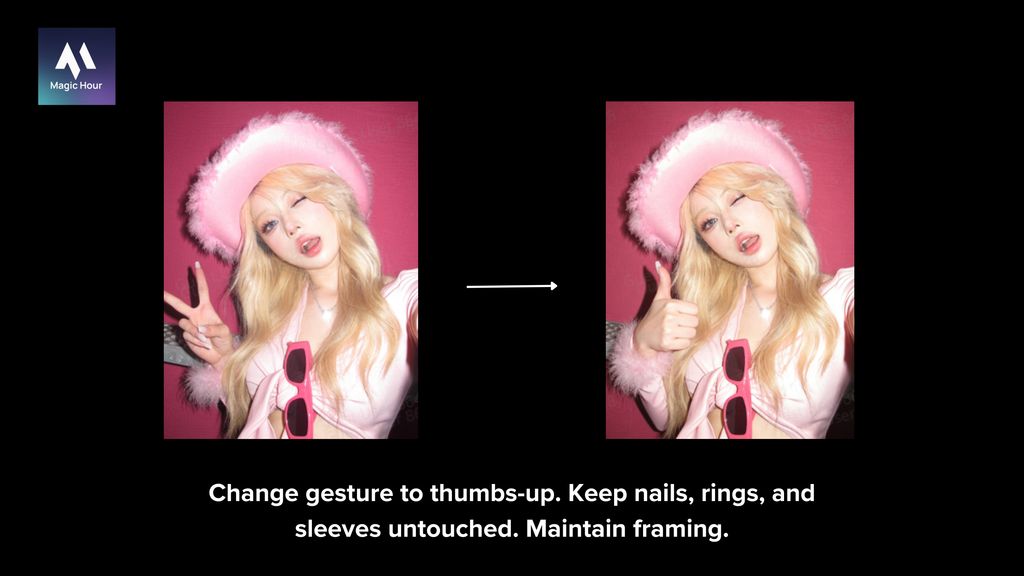
5) Gesture and pose adjustments
- Use case – Social tiles, thumbnails, posters.
- Instruction – “Change gesture to thumbs-up. Keep nails, rings, and sleeves untouched. Maintain framing.”
- Finishing – Check hands at 200%. Fix odd finger joints before export.
6) Poster layout system
- Use case – Campaign variants without redesigning from scratch.
- Instruction – “Create centered, top-bottom, diagonal, and left-right layouts. Keep brand marks. Swap headline between ‘Happily’, ‘Joyfully’, ‘Pleasantly’, ‘Interestingly’ with different handwritten styles.”
- Finishing – Kerning, contrast, and accessibility. Small adjustments matter more than you think.
7) City poster series
- Use case – Tourism, events, brand city drops.
- Instruction – “Replicate style across Shanghai, Beijing, Hangzhou, Chengdu. Switch main subject to a landmark. Update tagline.”
- Finishing – Confirm landmark accuracy and color harmonies per city.
8) Ratio remixes
- Use case – One visual, many channels.
- Instruction – “Remix to 16:9, 9:16, 3:4, 2:3, 4:3, 3:2, 1:1. Preserve subject scale and safe margins.”
- Finishing – Add social safe areas and export presets. Save yourself from re-exports later.
9) Background replacement and seasonal sets
- Use case – Evergreen content calendars.
- Instruction – “Replace background with office, forest, riverside, Times Square. Also create spring, summer, autumn, winter with pose and composition unchanged.”
- Finishing – Match shadows and edge light. The eye notices when light directions disagree.
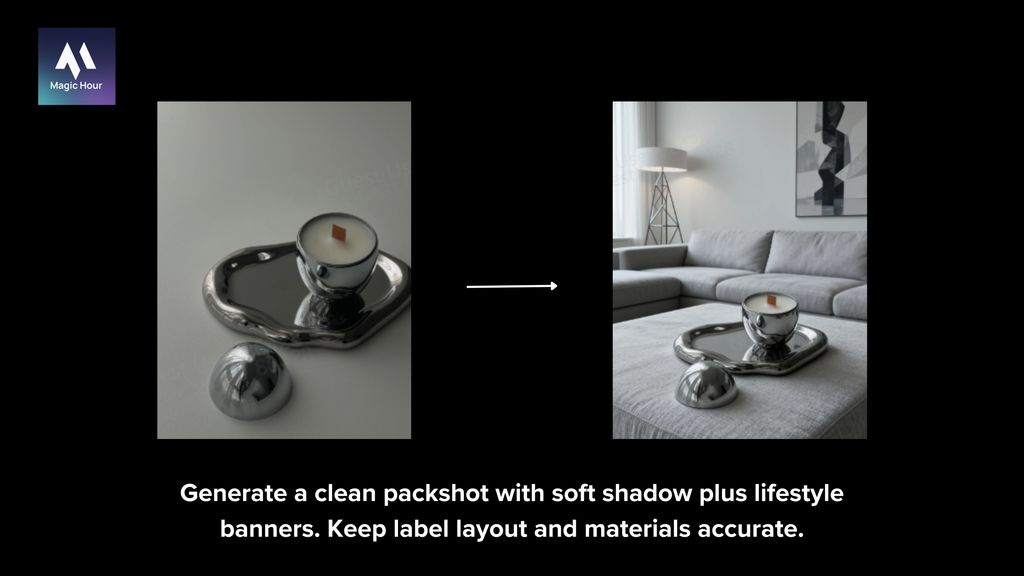
10) Product hero + lifestyle banners
- Use case – E-commerce and ads.
- Instruction – “Generate a clean packshot with soft shadow plus lifestyle banners. Keep label layout and materials accurate.”
- Finishing – Consistent white balance and micro-contrast across the set.
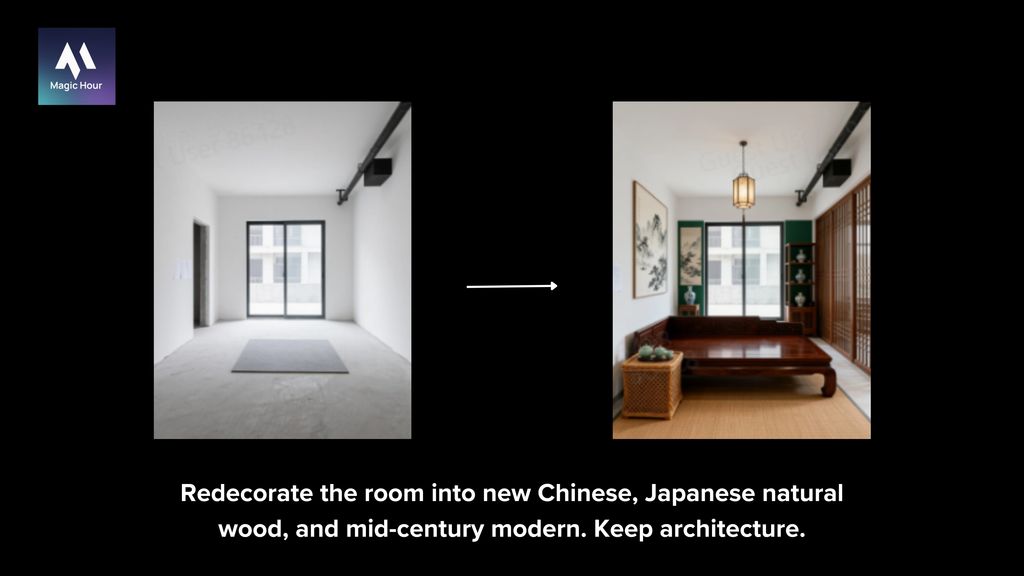
11) Interior restyling
- Use case – Real estate, decor e-commerce, content.
- Instruction – “Redecorate the room into new Chinese, Japanese natural wood, and mid-century modern. Keep architecture.”
- Finishing – Wood tones and shadow color. These two sell the illusion.
12) Retail facade transformations
- Use case – Concept art for small businesses.
- Instruction – “Turn the store into a coffee shop, burger shop, and light food shop. Update signage, color, and decor to fit each.”
- Finishing – Fix perspective on signs and window decals.
13) Brand merch and peripherals
- Use case – Launch kits and culture.
- Instruction – “Design T-shirts, hats, badges, canvas bags, and bracelets with the ‘Seedream 4.0’ name. Purple-led, clean, trendy.”
- Finishing – Realistic print bounds and cloth folds.
14) Product ad composites
- Use case – Carousel ads and hero tiles.
- Instruction – “Compose tidy ads with shallow depth of field and clean type. Keep legal text untouched.”
- Finishing – Re-grain for film looks if you mix sources.
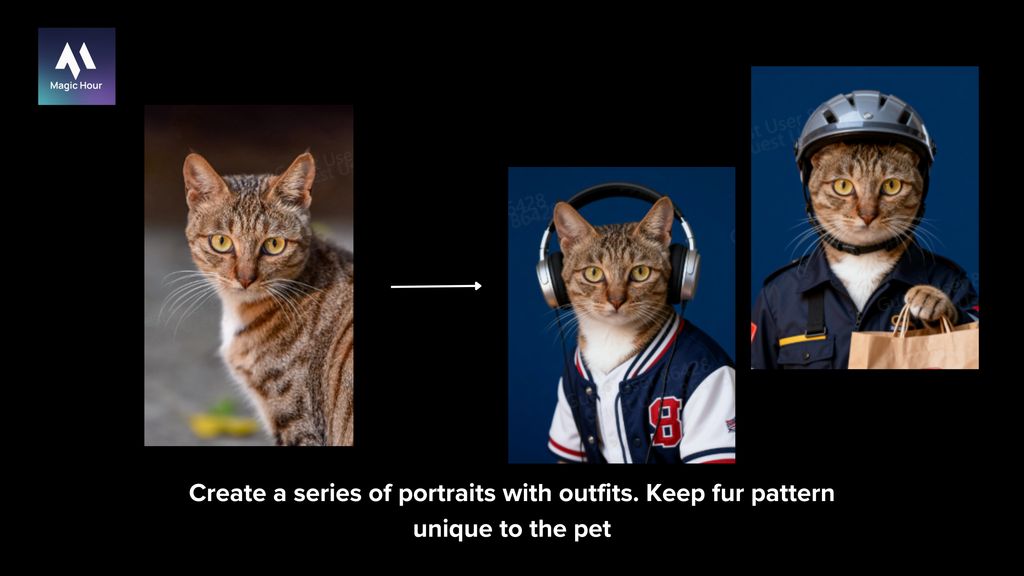
15) Pet personification
- Use case – Communities, gifts, brand mascots.
- Instruction – “Create a series of portraits with outfits. Keep fur pattern unique to the pet.”
- Finishing – Eyes and whiskers sell it. Don’t oversharpen.
16) Global style passes
- Use case – A/B testing looks.
- Instruction – “Render in anime, classical painting, pencil sketch, clay, vaporwave. Keep identity and pose.”
- Finishing – Choose two winners and standardize your palette.
17) Cartoon illustration
- Use case – Blog headers, explainers, decks.
- Instruction – “Convert to vector-like illustration with flat shading and crisp edges.”
- Finishing – Outline weights and color blocking.
18) Film storyboard beats
- Use case – Pre-viz and pitch decks.
- Instruction – “Generate 6–9 frames with consistent identity, camera angles, and lighting continuity.”
- Finishing – Add frame numbers and time-of-day labels.
19) Three-view sheets
- Use case – Character and product development.
- Instruction – “Create front, side, and back views with consistent proportions on a neutral background.”
- Finishing – Overlay guides and fix minor misalignments.
20) Cross-image style transfer
- Use case – Brand “house look.”
- Instruction – “Apply the color and texture style from Image B to subject in Image A. Keep pose and facial identity.”
- Finishing – Harmonize color without crushing skin tones.
21) Poster editing and subject swaps
- Use case – Fast updates to proven layouts.
- Instruction – “Replace the model in Poster A with person from Photo B. Match lighting direction and grain. Keep credits unchanged.”
- Finishing – Edge cleanup at hair and shoulder lines.
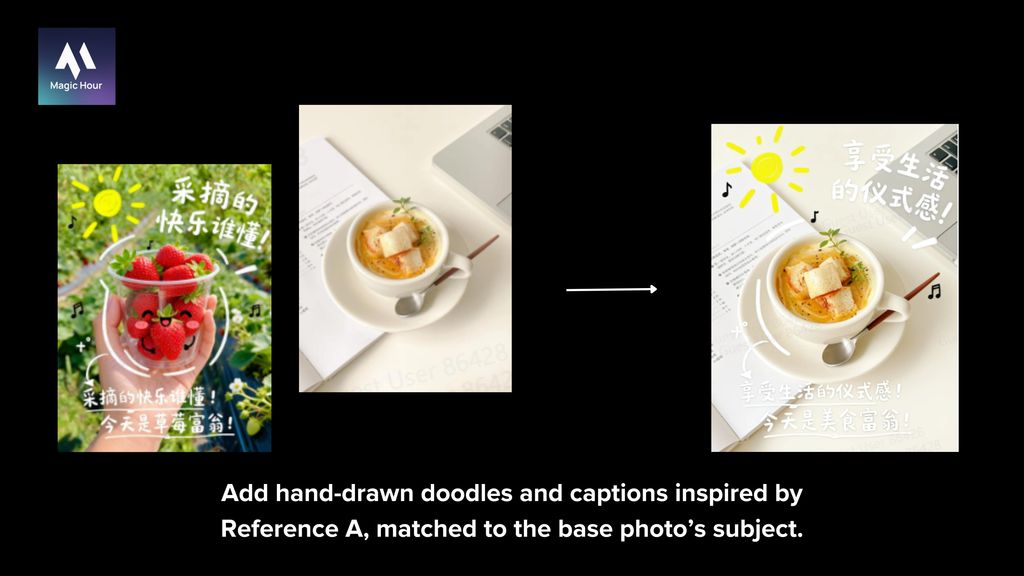
22) PLOG overlays
- Use case – Lifestyle storytelling.
- Instruction – “Add hand-drawn doodles and captions inspired by Reference A, matched to the base photo’s subject.”
- Finishing – Color-match doodles to the core palette.
23) Clothing replacement and try-on
- Use case – Virtual styling.
- Instruction – “Let the character in Photo 1 wear outfit from Photo 2. Preserve hair and accessories. Adjust sleeve to the wrist.”
- Finishing – Fabric folds and contact shadows.
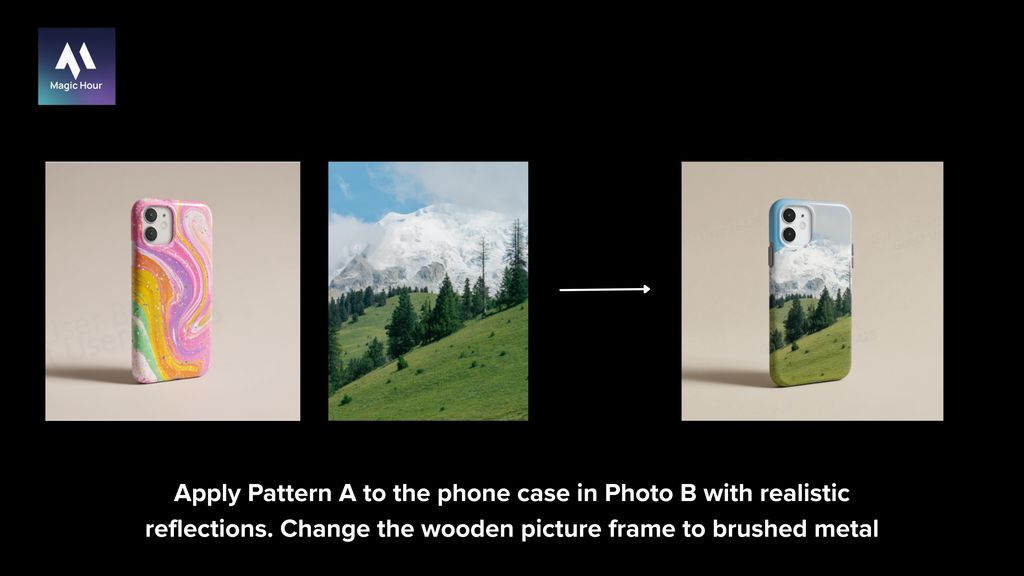
24) Pattern and material swaps
- Use case – Quick variants.
- Instruction – “Apply Pattern A to the phone case in Photo B with realistic reflections. Change the wooden picture frame to brushed metal.”
- Finishing – Check tiling and perspective warping.
Beauty and refinement tools inside the flow
For portraits, Seedream can run quick beautification:
- Skin refresh with restraint.
- Makeup presets: light, daily commute, Hanfu accents, Hong Kong style, Japanese, Korean.
- Hairstyles from French bangs to clavicle cuts to big waves.
- Hair colors like fog gray brown, wine red, haze blue, golden yellow, granny gray, and cherry blossom pink.
- Lighting looks: sunset, soft light, side backlight, dappled shade, Tyndall light.
- Camera vibes: Polaroid borders, vintage CCD, classic monochrome.
- ID photos with strict sizing and neutral backgrounds.
These are time savers, not magic. After the automatic pass, open the image in Magic Hour’s editor for gentle texture control, white balance, and export rules.
Composition controls that make sets feel designed
You can ask for:
- Lens perspective – top-down, low angle, side view, back view.
- Shot size – panorama, wide, medium, close-up, extreme close-up.
- Framing – maintain leading lines and level horizons, protect headroom.
When you generate a set with consistent perspective and shot size, it reads like a system, not a collage.
Restoration and upscaling
For older or damaged photos:
- Colorize using restrained palettes.
- Repair scratches and tears without over-sharpening faces.
- Upscale for print, then give a subtle micro-contrast or grain pass in Magic Hour so it doesn’t look plasticky.
Multi-image input and output without confusion
Multi-image editing is where Seedream earns its keep, but only if you label intent clearly. A reliable pattern:
- Provide 3–6 identity references of the same subject at slightly different angles.
- Provide material close-ups if texture matters—fabric weaves, woods, metals.
- Provide separate style references for palette and treatment.
- Then assign roles explicitly in the prompt:
“Use the jacket from Image 2, background from Image 3, and color grading from Image 4. Keep the face from Image 1 unchanged.”
For output, ask for groups explicitly:
“Generate a set of 6 images with consistent palette and camera rules, vary environments across studio, beach, and city dusk.”
Troubleshooting – why results sometimes miss, and how to fix them
Symptoms and causes
- “It changed the wrong thing.”
You didn’t name what must not change. Add a first line that locks identity and immutable elements. - “It looks different each time.”
Your instruction is short and open-ended. Be concrete about palette, lighting, and scope. If you want variety, ask for it deliberately. - “The background changed but the subject drifted.”
Add “edit background only,” or supply a mask. In multi-subject images, reference the exact location: “Change the frame above the vase in the upper right.” - “The edit is physically off.”
The request isn’t physically consistent with the photo. Re-describe lighting and perspective so the model has a feasible target. - “The image feels… AI.”
Add constraints on texture and keep fine details from the original. Finish with a gentle grain pass; it hides small sins.
A better prompt, by example
Weak: “Make it better.”
Strong: “Keep face, hair, and earrings unchanged. Replace background with a rainy city street at night, visible reflections on pavement. Add soft rim light from camera right to match the scene. Edit background only.”
A small prompt cookbook
Copy, paste, and adapt.
- Background swap with identity lock
“Keep face, hair, and pose unchanged. Replace background with a forest trail at golden hour. Add light wrap from camera left. Edit background only.” - Outfit change
“Swap the jacket to navy with gold buttons. Keep shirt, tie, and skin untouched. Maintain sleeve length to the wrist. Preserve fabric texture.” - Poster text replacement
“Replace headline with ‘Autumn Collection’ and subhead with ‘Quiet Luxury’. Keep font, size, and position identical. Edit text blocks only.” - Style with structure
“Render as watercolor while keeping proportions, facial features, and composition. Soft edges, warm palette, paper texture, no extra objects.” - Set generation
“Produce 6 images with identical subject and palette. Vary backgrounds across studio seamless, beach midday, and city dusk. Keep camera height constant.” - Material swap
“Change the wooden picture frame to brushed metal with soft reflections. Keep glass and photograph unchanged.” - Pattern application
“Apply Pattern A to the phone case with realistic reflections and curvature. Maintain camera angle and highlights.”
Team workflow that balances speed and control
- Brief – Write the instruction following the four-line order. Drop references into a shared folder.
- Generate – Run single or batch. If you’re exploring, ask for 6–9 options.
- Select – Pick 1–2 winners quickly. Don’t get precious.
- Finish – Open in Magic Hour’s AI Image Editor for the last 10%: crop, export sizes, small color moves, overlays, watermark.
- Ship – Save export presets so tomorrow’s work is push-button.
You’ll notice the finish step ends up being the same every time. That’s a feature, not a bug. Consistency builds brand.
Guardrails for brands
- State immutables up front: logos, legal text, safety labels, model numbers.
- Be explicit with identity and likeness. If in doubt, lock the face and hair.
- Avoid adding objects that change meaning. If you must, declare them clearly.
- Keep a short “red list” of things your prompts should never introduce.
These little boundaries make legal and brand reviews faster. You’ll onboard teammates with one document instead of a week of back-and-forth.
When to reach for Magic Hour’s AI Image Editor instead
Seedream is for the heavy moves. Magic Hour’s editor is for quick, precise finishing when you already like the image:
- Background cleanup and minor inpainting.
- Exact crop and ratio sets for every channel.
- Subtle exposure and color corrections.
- Logo overlays, captions, and watermarks.
- Export presets for performance and handoff.
Most days you’ll chain them: big edit upstream, polishing pass downstream, publish.
Closing thoughts
If you’re a solo creator or a two-person team, tools don’t just need to be powerful. They need to be predictable. Seedream Edit is predictable when you tell it, in order, what must not change, what to change, how far to change it, and what the final look should be. Multi-image input becomes an edge, not a headache, once you assign roles to each reference. And the boring parts—crops, exports, small color moves—belong in a lightweight editor you trust.

