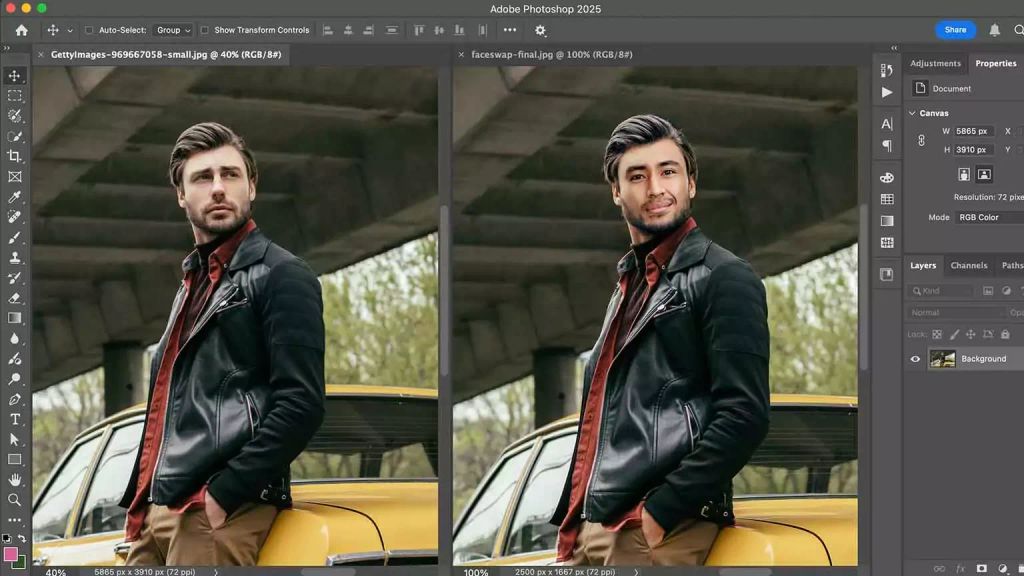
Whether you’re creating a fun edit, working on a creative project, or retouching an image for professional use, knowing how to face swap in Photoshop can be a game-changer.
Photoshop gives you powerful tools to make face swaps look natural — no awkward edges, no mismatched skin tones. In this guide, I’ll walk you through the process step-by-step, from selecting the right images to blending everything seamlessly.
What Is Face Swap?
Face swapping is the process of replacing one person’s face with another in an image. It’s commonly used in photography, digital art, entertainment, and even marketing to create realistic edits or fun transformations.
Face swaps traditionally require manual selection, blending, and color correction using Photoshop tools like the Lasso Tool, Layer Masks, and the Clone Stamp.
These days, AI-powered face swap tools (including video editing software) have made the process faster and more accessible, automatically detecting and aligning faces for a seamless look. Some AI video generators are even able to face swap and turn your work into video. While AI can make face swaps effortless, it’s still important to fine-tune the details for the most realistic results.
That said, ethical considerations matter. Face swapping should always be used responsibly — avoiding deception, misrepresentation, or the unauthorized use of someone’s likeness. Whether using Photoshop or AI, the goal should be creativity and enhancement, not misleading alterations.

How To Face Swap in Photoshop: A Quick Guide
Face swapping in Photoshop is a straightforward process when you use the right tools. With selection, alignment, and blending techniques, you can create a seamless swap that looks natural. This guide covers step-by-step instructions on selecting images, cutting out faces, matching skin tones, and blending edges for a clean result. Let’s get started.
1. Select Your Images

For a natural face swap, start with high-quality images that have similar lighting, angles, and expressions. The closer the two faces match in perspective and lighting, the easier it will be to swap them.
2. Open Both Images in Photoshop
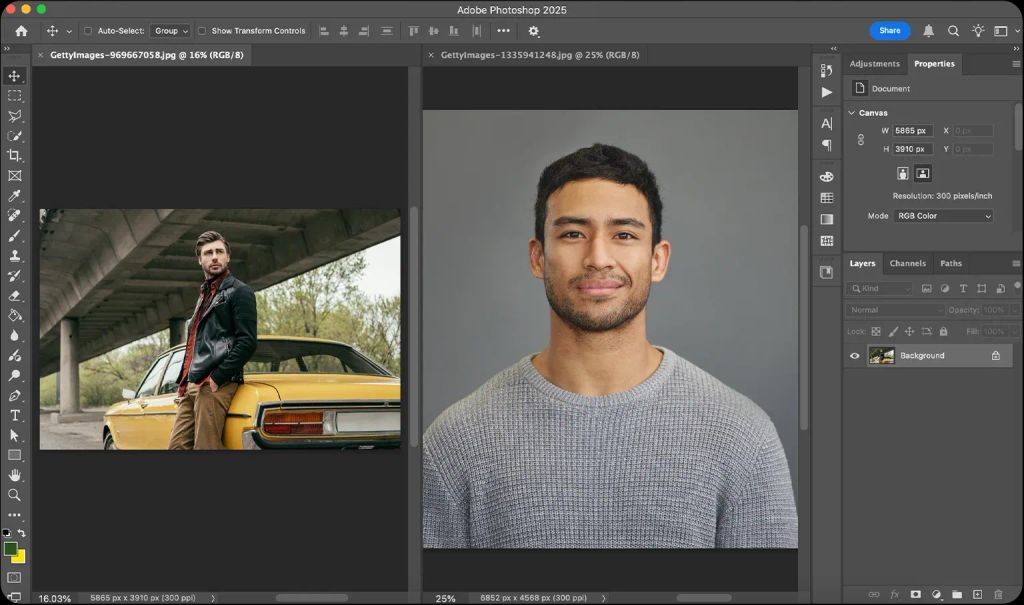
Start by opening both images in Photoshop:
- Open Photoshop and go to File > Open, then select the two images you want to use.
- Once both images are open, go to Window > Arrange > 2-up Vertical to view them side by side.
- Use the Move Tool (V) to drag one image into the other’s workspace. This will automatically create a new layer in the Layers panel.
If necessary, use Edit > Free Transform (Ctrl + T / Cmd + T) to resize or rotate the new face so it aligns with the target image before starting the swap.
3. Use the Lasso Tool or Pen Tool
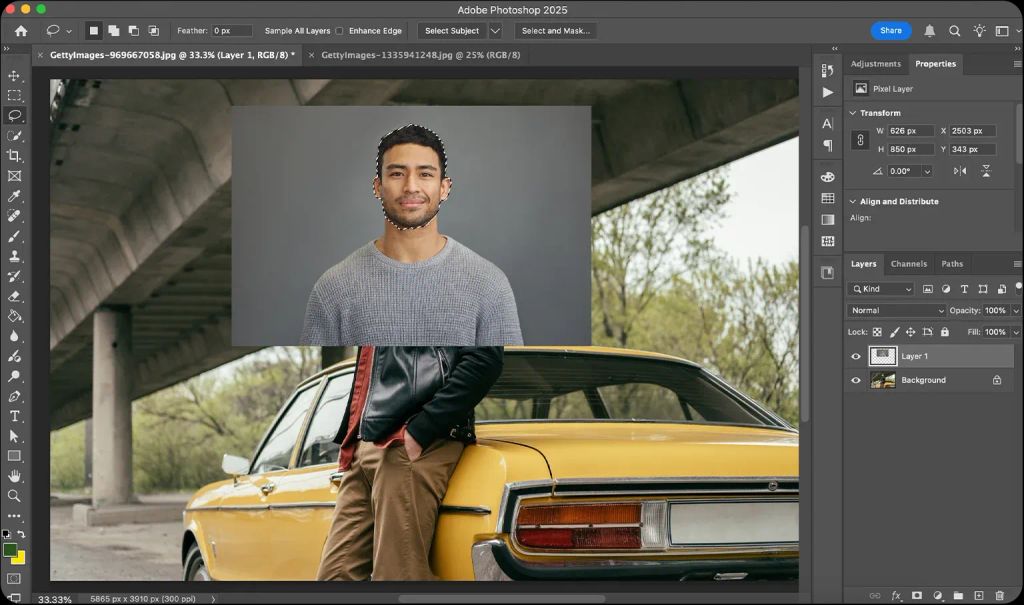
To cut out the face you want on your final image, use either the Lasso Tool for a quick selection or the Pen Tool for a precise cut:
Lasso Tool (Quick Method):
- Select the Lasso Tool (L) from the toolbar.
- Draw a rough selection around the face, including some surrounding skin for blending.
- Go to Edit > Copy (Ctrl + C / Cmd + C) to copy the selection.
Pen Tool (Precise Method):
- Select the Pen Tool (P) and click to create anchor points around the face.
- Once outlined, right-click and choose Make Selection with a 2-pixel feather for smooth edges.
- Copy the selection (Ctrl + C / Cmd + C).
4. Copy and Paste the Face Onto the Target Image
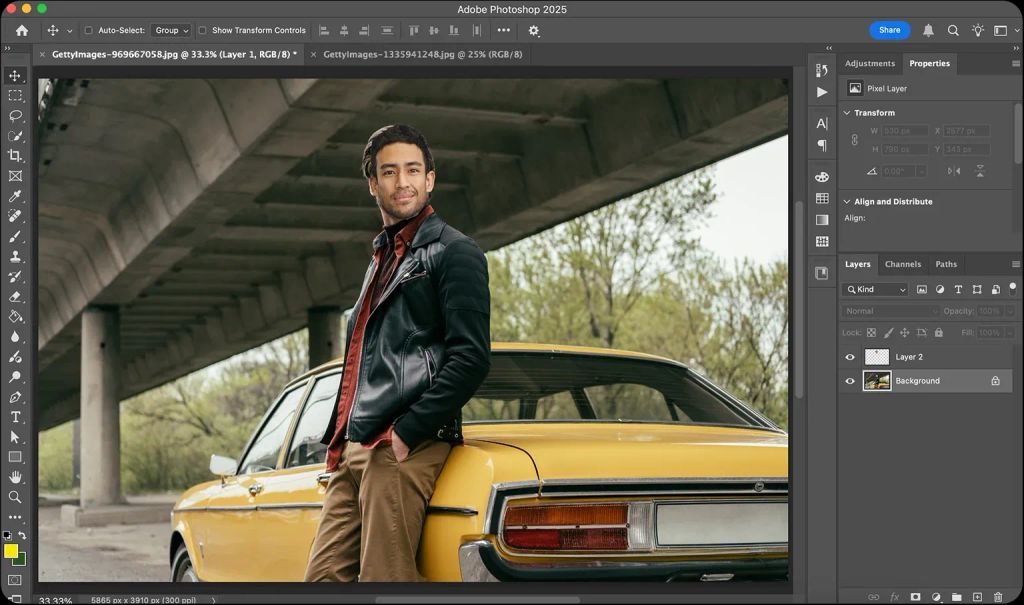
Now that you’ve selected the face, it’s time to paste it onto the target image and position it correctly:
- If you haven't already, press Ctrl + C (Cmd + C) to copy the selected face.
- Switch to the target image and press Ctrl + V (Cmd + V) to paste the face as a new layer.
- Select the Move Tool (V) and drag the face into position, aligning it over the original face.
Use Edit > Free Transform (Ctrl + T / Cmd + T) to resize, rotate, or flip the new face as needed. Hold the Shift key while resizing to maintain proportions, and adjust the placement until it closely matches the original facial structure. Next, you’ll refine the blend for a seamless look.
5. Adjust Skin Tone and Blend Edges
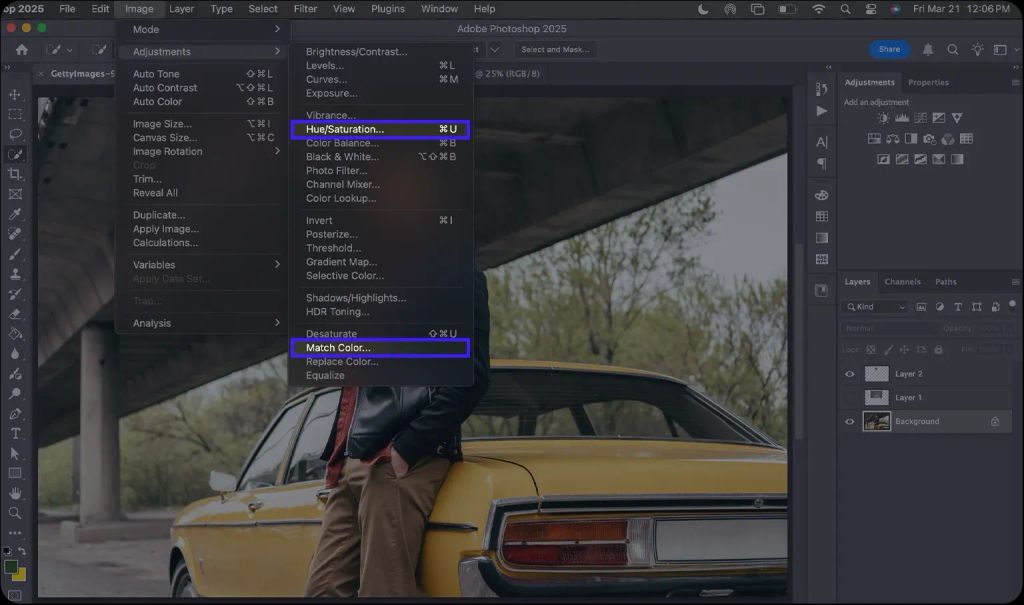
Once you’ve placed the new face on your target image, it’s just a matter of making sure it looks as natural as possible. Here’s how you can do that by matching skin tones:
- Select the new face layer and go to Image > Adjustments > Match Color.
- Under Source, choose the target image to match the colors.
- Adjust the Luminance and Color Intensity sliders until the tones match.
- If needed, use Image > Adjustments > Hue/Saturation (Ctrl + U / Cmd + U) to fine-tune the skin tone.
Another important touch is refining and blending edges so that the transposed face doesn’t look strange, off-putting, or obviously photoshopped. Here’s how you can blend the edges:
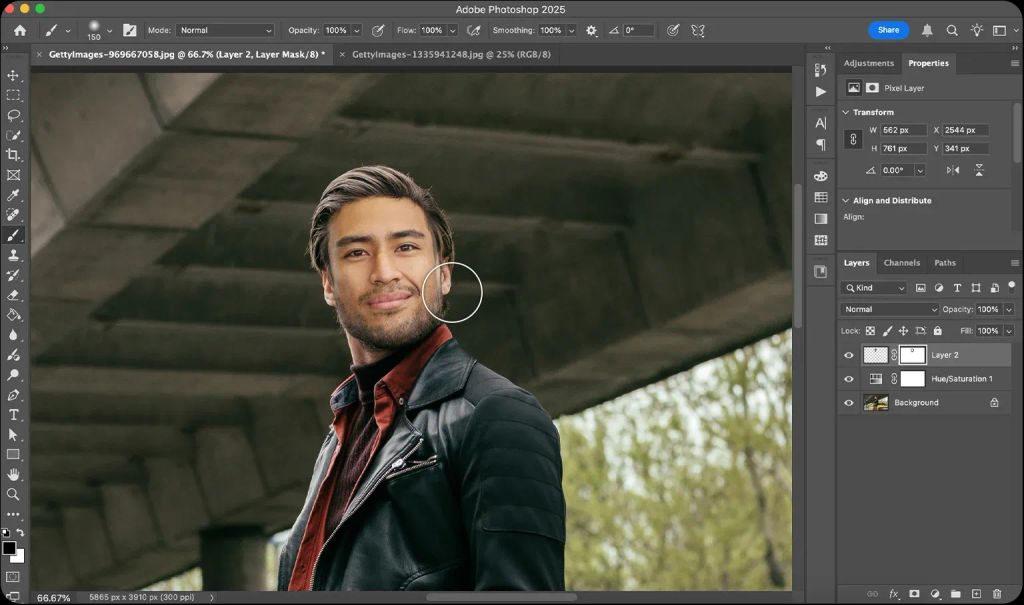
- Add a Layer Mask to the new face (Layer > Layer Mask > Reveal All).
- Select the Brush Tool (B), set it to a soft round brush, and gently erase hard edges to blend the new face into the original skin.
- Use the Clone Stamp Tool (S) or Healing Brush Tool (J) to remove any harsh seams.
Once the tones and edges are blended, the face swap should look natural. Now all that’s left is a few finishing touches for a polished result.
6. Fine-Tune Details
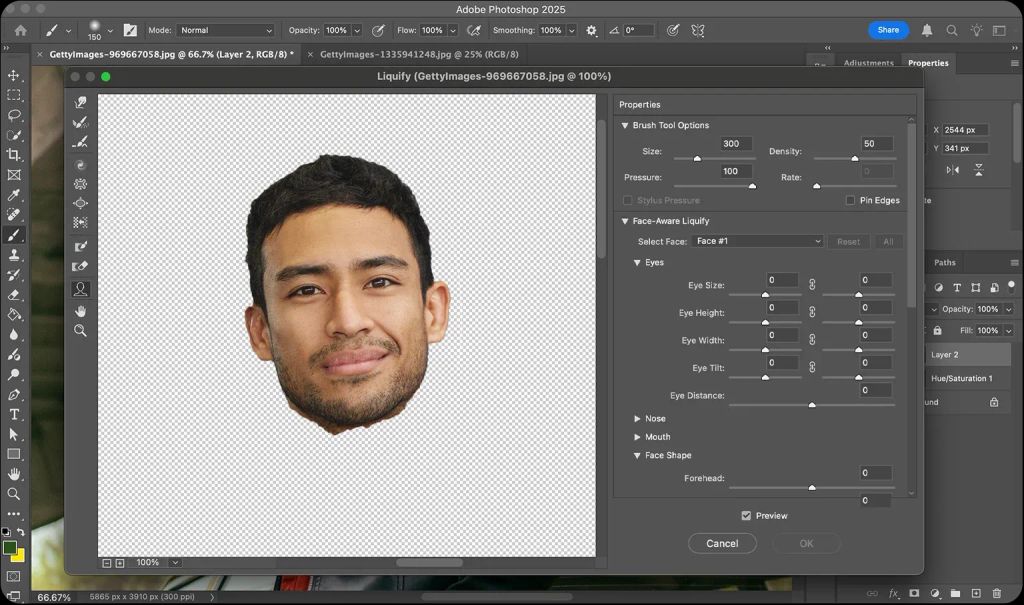
To make the face swap look as natural as possible, start by adjusting facial features:
- Select the new face layer and go to Filter > Liquify.
- Use the Forward Warp Tool (W) to subtly adjust the facial structure so it aligns with the original image.
- Avoid excessive warping — small tweaks help maintain realism.
You can also blend the skin texture, which smoothes out any mismatched textures between the face and the target image. Here’s how:
- Use the Clone Stamp Tool (S) or Healing Brush Tool (J) to smooth any mismatched textures.
- Set the brush to a low opacity and sample nearby skin for a seamless blend.
Last but not least, for your image to appear authentic, you need to consider the lighting and shadows. Here’s how you can match the new face’s lighting to the rest of the image:
- Create a new layer, set it to Soft Light, and use a soft brush with black or white to add subtle shadows and highlights.
Once you’re done, you can save your work and export it in your preferred format.
Pro Tips for a Natural Face Swap
A great face swap isn’t just about placing one face over another; it’s about making it look like it was always there. The key is subtlety — small, precise adjustments make a face swap look flawless and natural. To achieve a realistic, seamless blend, keep these pro tips in mind:
- Match lighting and shadows: If the lighting on the new face doesn’t match the original, use Image > Adjustments > Curves or Dodge & Burn to tweak highlights and shadows. Subtle adjustments make a big difference.
- Avoid distortion: When resizing the face (Ctrl + T / Cmd + T), hold the Shift key to maintain proportions and prevent warping. Use Edit > Puppet Warp for fine adjustments if needed.
- Use blending modes and opacity: If the new face doesn’t blend smoothly, lower the layer’s opacity slightly or set the blending mode to Lighten or Overlay for a better match.
- Try AI-powered plugins: AI tools like Photoshop Neural Filters or third-party face swap plugins can speed up the process and help with automatic skin tone matching.
Alternative Tools: Face Swapping With AI
While Photoshop gives you full control over a face swap, AI-powered face swap tools like Magic Hour and FaceFusion offer a faster, more accessible alternative. These tools use machine learning to automatically detect, align, and blend faces, saving time and reducing the need for manual adjustments.
For casual users, AI face swap tools are a great option for quick edits and fun projects without the learning curve of Photoshop. Professionals can also benefit by using AI tools to handle the initial face swap and then refining the results in Photoshop for a polished finish.
One of the best AI face-swapping tools available is Magic Hour. It simplifies the process by allowing users to upload images, select a face swap option, and let the AI handle the rest, all in just a few clicks. Unlike Photoshop, which requires multiple steps to achieve a realistic blend, Magic Hour gives you automated alignment, lighting adjustments, and natural skin tone blending instantly, making it perfect for both beginners and professionals looking for efficiency.

Explore Magic Hour for Your Face-Swapping Needs
Mastering how to face swap in Photoshop gives you complete control over every detail, from alignment to blending. But if you're looking for a faster, more intuitive solution, AI-powered face swap tools offer an effortless way to achieve realistic results. Whether you prefer Photoshop’s manual precision or AI’s quick automation, the right tool depends on your needs and workflow.
Want to explore how to face swap with AI? Check out our AI-powered editing tools to simplify complex edits, speed up your workflow, and unlock new creative possibilities.
