How to Use FaceFusion: A Step-by-Step Guide to Face Swapping and Enhancing


Have you ever wanted to learn how to create face swap videos and photos on your own computer? In this blog post, we'll teach you how to do that using FaceFusion, one of the best face swap apps that allows you to swap and enhance faces in your images and videos.
FaceFusion is an open source project that has been making waves in the open source community in the past year. It has advanced features and a user-friendly interface for face swapping, face enhancing, and lip syncing, and has become one of the top projects in the AI space for creators and developers who want to manipulate videos using AI. Whether you're a video editor, content creator, or just someone who likes to experiment with AI, FaceFusion likely has something to offer.
In this article, we'll deep dive into the software, exploring its features, settings, and capabilities. We'll start with a quick overview of how to upgrade to the latest version, then move on to the basics of using FaceFusion. From there, we'll delve into the more advanced features, such as infra settings, face swapping models, and face enhancement options.
By the end of this post, you'll have a comprehensive understanding of FaceFusion and how to use it to its full potential. So, let's get started!
Upgrading to the Latest Version of FaceFusion
Before we dive into the software, it's important to make sure you have the latest version of FaceFusion installed. As of the time of this writing, the current version is 3.1.1, which includes a few new features and improvements.
If you don't have FaceFusion installed at all, and haven't installed a repo before, check out the full installation instructions that FaceFusion has provided. This will walk you through the process of getting FaceFusion up and running on your system.
But to give a brief overview, if you're familiar with installing repos, you can run `git clone https://github.com/facefusion/facefusion` in your terminal.
Once you have the repo installed, you'll need to install additional packages that are needed to run it. Here's how:
- Open your terminal application and navigate to the FaceFusion directory by typing
`cd facefusion`. - For Mac and Linux users, type the following commands to create a virtual environment and install the new version:
`python3 -m venv env``source env/bin/activate``python3 install.py --skip-conda --onnxruntime {default, ...}`
- For Windows users, the commands are slightly different, and I would refer to the full guide.
- Once the installation is complete, you can run FaceFusion by typing
`python facefusion.py run --open-browser`. If successful, the output will include a link to a GUI which will open in your default browser.
Once everything is installed, you're ready to dive into the software and explore its features. If local deployment feels too complicated or you prefer not to install anything locally, consider MimicPC - a cloud-based platform that integrates FaceFusion for seamless online use, allowing you to swap and enhance faces directly in your browser without any setup hassles. Try FaceFusion online for free now by logging into MimicPC and adding it to your dashboard.
The Basics of Using FaceFusion
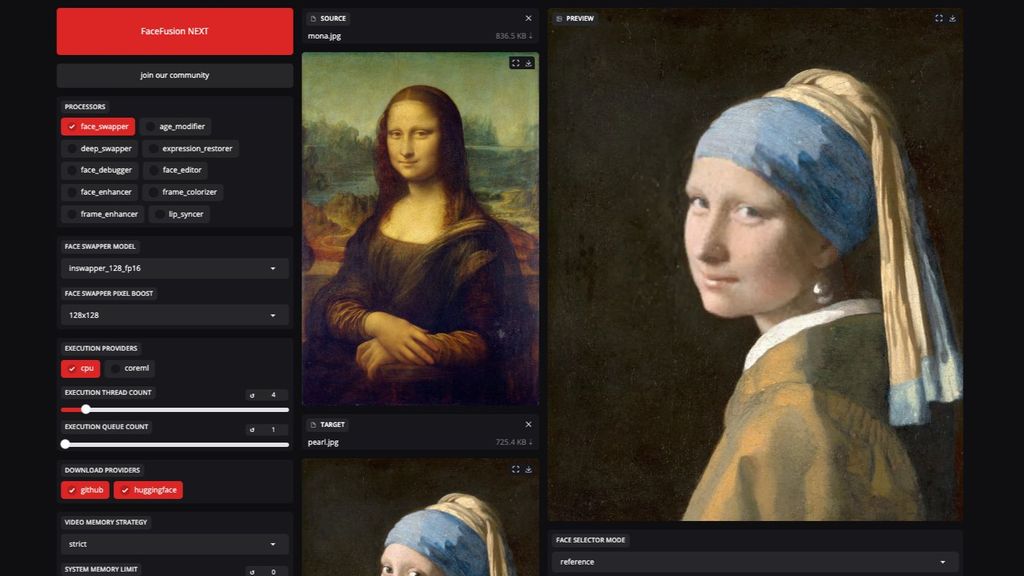
When you first launch the FaceFusion GUI, you'll see a user-friendly interface that may seem a bit overwhelming at first. However, once you get the hang of it, you'll find that it's actually quite intuitive and easy to use.
The first thing you'll want to do is make sure you have the correct execution provider selected. Depending on your system, you'll want to choose either Core ML (for Mac), CUDA (for Nvidia GPUs), or the appropriate option for AMD GPUs. This will ensure that your face swapping and enhancement tasks are processed as efficiently as possible.
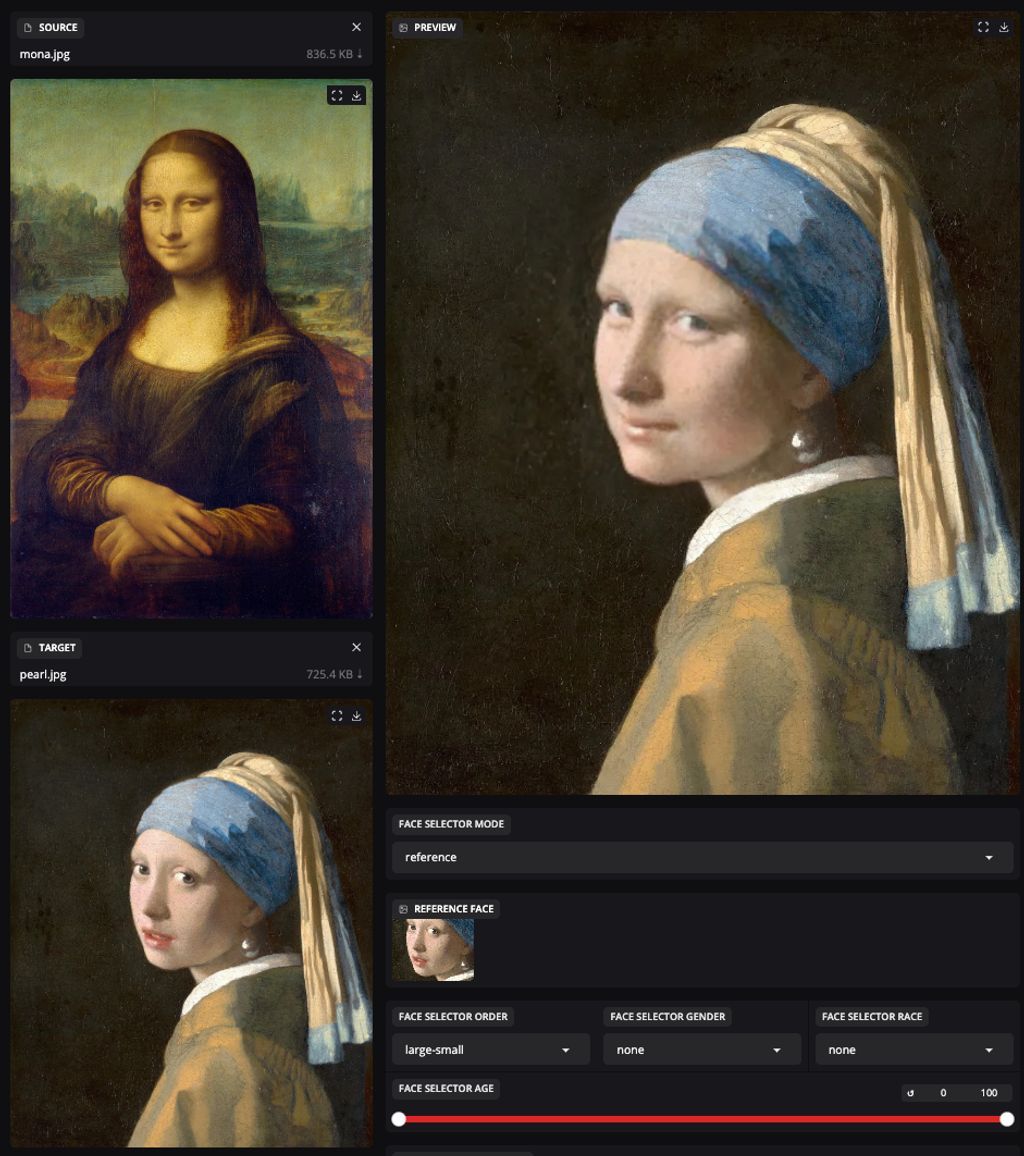
Next, you'll need to drag and drop your source and target images or videos into the designated areas. The source image is the one you want the person in the new image to look like, while the target is the image or video you want to modify.

If your target image or video only has one obvious person in it that you want to swap, you should be able to simply click the "Start" button and wait for the output. That's it! In some cases, it really can be that simple.
Exploring the Advanced Features of FaceFusion
Of course, FaceFusion has a lot more to offer than just the basic face swapping functionality. Let's dive into some of the more advanced features and settings that you can use to fine-tune your results.
Execution Providers and Thread Counts
As mentioned earlier, the execution provider setting is crucial for ensuring optimal performance. The thread count setting is also important, as it determines how many threads FaceFusion will use to process the face swapping and enhancement tasks.
For Mac users with an M1, M2, or M3 chip, you'll want to select the "Core ML" execution provider and set the thread count to around 10-16, as the shared memory on Apple silicon seems to work best in this range.
For users with dedicated Nvidia GPUs, you can try a 2:1 ratio, so if you have a 16GB GPU, you can set the thread count to 32.
The execution queue count is another setting you can play with, but most users will likely keep it at the default of 1.
Output Path and Options
The output path setting is where FaceFusion will save your rendered images and videos. By default, it uses a rather strange path, but you can change this to a directory of your choice.
One thing to note is that FaceFusion doesn't seem to like any spaces in the output path, so it's best to avoid using them. Additionally, the software doesn't save the custom output path you set, so you'll need to change it every time you launch the app.
As for the other options, they're fairly straightforward:
- Keep FPS: Maintains the original frame rate of your target video.
- Keep Temp: Keeps the temporary image files used during the rendering process.
- Skip Audio: Strips the audio from your target video.
- Skip Download: Skips the initial download of the face swapping and enhancement models, which can be useful if the models are already cached on your system.
The Preview Window and Trim Frames
One of the most important features in FaceFusion is the preview window. This allows you to see the results of your face swapping and enhancement in real-time, before rendering the final output.

The preview frame slider is particularly useful when working with videos, as it allows you to scrub through the different frames and see how the face swapping is being applied across the entire clip.
The "Trim Frame Start" and "Trim Frame End" settings are also valuable, as they let you specify the exact portion you want to render. This can be especially helpful if you only need to swap a specific section of a longer clip.
Face Selector Modes: Reference, One, and Many
FaceFusion offers three different face selector modes: Reference, One, and Many. Each mode has its own unique use case, so let's explore them in more detail.
Reference Mode: This mode allows you to select a reference face from the target image or video, and then apply the source face to that specific person. This is useful when you have multiple people in the target and you want to swap the face of a specific individual.
One Mode: As the name suggests, this mode will only swap the face of a single person in the target. The challenge here is making sure FaceFusion selects the right person, which is where the "Face Analyzers" come in handy.
Many Mode: This mode will attempt to swap the source face onto as many faces as it can detect in the target. This can be a powerful option, but it also requires more fine-tuning to ensure the results look natural.
Face Swapper and Face Enhancer Models
FaceFusion comes with a variety of face swapper and face enhancer models, each with its own strengths and weaknesses. Let's take a closer look at some of the most popular options:
Face Swapper Models:
- InSwapper 128: This is considered one of the best overall options, providing a good balance of quality and speed.
- InSwapper FP16: Offers slightly better quality than the 128 model, but takes significantly longer to process.
- Blend Swap, SimSwap 256, and SimSwap 512: These models generally produce lower-quality results compared to the InSwapper options.
Face Enhancer Models:
- GFP-GAN 1.4: Produces excellent results, with a realistic and film-like appearance, but takes longer to render.
- CodeFormer and GPenBFR 512: Also provide high-quality results, with a more natural look compared to the plasticky appearance of some other models.
- Restore Former: This model had some issues in my testing, with distortions in certain areas of the output.
The face enhancer "Blend" setting is also worth experimenting with, as it allows you to adjust the balance between the original and enhanced faces.
Frame Enhancer and Face Debugger
While the face swapping and enhancement features are the main draw of FaceFusion, the software also includes a frame enhancer and a face debugger.
The frame enhancer is a video upscaler that can double or quadruple the resolution of your target footage. However, the creator of this video notes that the additional processing time required for this feature makes it less practical for most use cases.
The face debugger, on the other hand, is a powerful tool for fine-tuning the face masking and tracking. It allows you to see the bounding boxes, key points, and scores for the detected faces, as well as adjust the padding and blurring of the face mask. This can be particularly useful when dealing with complex scenes or partially occluded faces.
Conclusion
FaceFusion is a truly impressive piece of software, packed with a wealth of features and capabilities. From the basic face swapping functionality to the advanced face enhancement and debugging tools, this application offers a comprehensive suite of tools for anyone looking to take their visual content to the next level.
Whether you're a professional video editor, a content creator, or just someone who loves to experiment with visual effects, FaceFusion is definitely worth exploring. With its intuitive interface, powerful processing capabilities, and a wide range of customization options, this software is sure to become an invaluable part of your creative toolkit.
If you're new to FaceFusion or need a refresher, check out this helpful Install Video that a FaceFusion user created. And as always, feel free to reach out with any questions or feedback. The FaceFusion community on Discord is also a helpful resource. Lastly, if you want to create Face Swaps for free without the hassle of installing anything, check out free face swap tool, which lets you get started with no sign up required.


